Service Fabric: Getting started with a frontend website and a partycluster
This is going to be a quick guide to spinning up an ASPNET 5 website on Service Fabric.
To host it we’re going to use the “Party Cluster” service from the team. This lets you grab a slot on a free public Service Fabric cluster to try out things and get up to speed.
So first things first, head over to the Party Cluster site and sign up for a cluster. http://aka.ms/tryservicefabric 
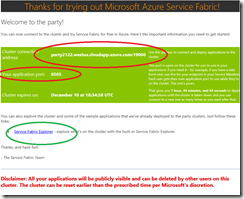
Once you’ve requested access to a cluster (Tip: Pick the one with the most time left to run on it!) you’ll get an email like this one.
The three key bits of info are highlighted, we’ll use these to host our website! Have a read of the rest of the mail too as it details the limitation of the party clusters, limited time, shared etc.
First up the green circle is the link you can use to see the Service Fabric Explorer, we’ll use this later to see our app provision and check it’s health.
Second is the connection address and the port you’ve been allocated, our site will end up being hosted at the connection address plus our application port so in this case http://party2122.westus.cloudapp.azure.com:8505
Now lets create our website and publish it to the cluster! I’ll assume at this point that you’ve followed the install guides for getting your local environment setup, don’t worry if you haven’t .. I’ll wait. Head here and follow the guide.
So now that’s all set lets get into it. Jump into VS2015 and create a new Service Fabric project, then select “ASP.NET 5” lastly select “Web Application” and for simplicity set it to have “no authentication” (this isn’t a must just keeps the project simpler). Here is a quick recording of the process.
(GIF recording below may take a sec to load, if you want to do these yourself see this awesome project ScreenToGif)
Next up we need to make some simple changes to the web app so it runs nicely on our party cluster. First up we need to chance the instance count of the service to “-1”. This instructs Serivce Fabric to run an instance on each node in the cluster which ensures that, when the load balancer round robins between the nodes, we always hits the site ( more info here). To do this - kick off a build of the Service Fabric project, once it’s completed, open up the “ApplicationManifest.xml” file. Find the XML node call “StatelessService” and add a property for “InstanceCount” of “-1”, so you end up with roughly this:
<StatelessService ServiceTypeName="Web3Type" InstanceCount="-1">(If you want to handle this nicely for the local dev scenario you can create a parameter for this setting and have different values specified in the “ApplicationParameters” folder for both local and cloud.)
Step 2 is setting the port of the web app to the port we where assigned on the party cluster. Head to your Web project and under “PackageRoot” folder open up the “ServiceManifest.xml” file. Look for this element:
<Endpoint Name="Web3TypeEndpoint" Protocol="http" Type="Input"/>Add in Port=”8505”, but replace this with the application port you received in your email from the party cluster.
Lastly, head to the Service Fabric project again and under the “PublishProfiles” folder open “Cloud.xml” and add in the connection string for your party cluster – like so:
<ClusterConnectionParameters ConnectionEndpoint="party2122.westus.cloudapp.azure.com:19000" />Then you’re all set, you can right click on the Service Fabric project and click publish. It will then push your project to the cluster and spin up the service on the nodes. Once it’s done you can navigate to your http://cluster:applicationPort and you’ll see your website up and running. You can also navigate to the Service Fabric Explorer, with the link you got in the party cluster mail, and have a look at the health status of the application and serivce on the cluster nodes.
Here is a quick recording of me running through this end to end. (Again GIF recording below may take a sec to load)
Now you’ve got your simple web frontend up and running on Service Fabric it’s time to dive into the fun stuff. Take a look at the StatefulService and Actor programming models and start building out your microservice based application. There is great content to get you started on the Azure site here!


